
I have a beautiful Tineke Rubber Plant. It has great color and has overall been doing great. However, I recently realized it’s been in the same pot since I got it several years ago. The top side is starting to get really tall and it’s looking a bit too big for its current pot. In this post, I’ll tell you some signs that mean you might want to consider repotting your rubber plant, how to repot, and how to avoid repotting shock after the fact.
Signs to Repot Your Rubber Plant
The Roots are Filling Out the Pot
This is the reason I am repotting my Rubber Plant. It’s good to keep tabs on the last time you repotted all of your plants. Some grow more quickly than others and thus will need to be repotted more frequently. Rubber Plants are actually pretty slow growers, so you can often go years in between repotting. For the slow growers especially, it’s nice to have a system to remember the last time you repotted. You could keep a file on your phone or PC for example. I like to just write the date on a piece of painter’s tape and stick it to the bottom of the pot. Fast-growing plants may need to be repotted once a year.
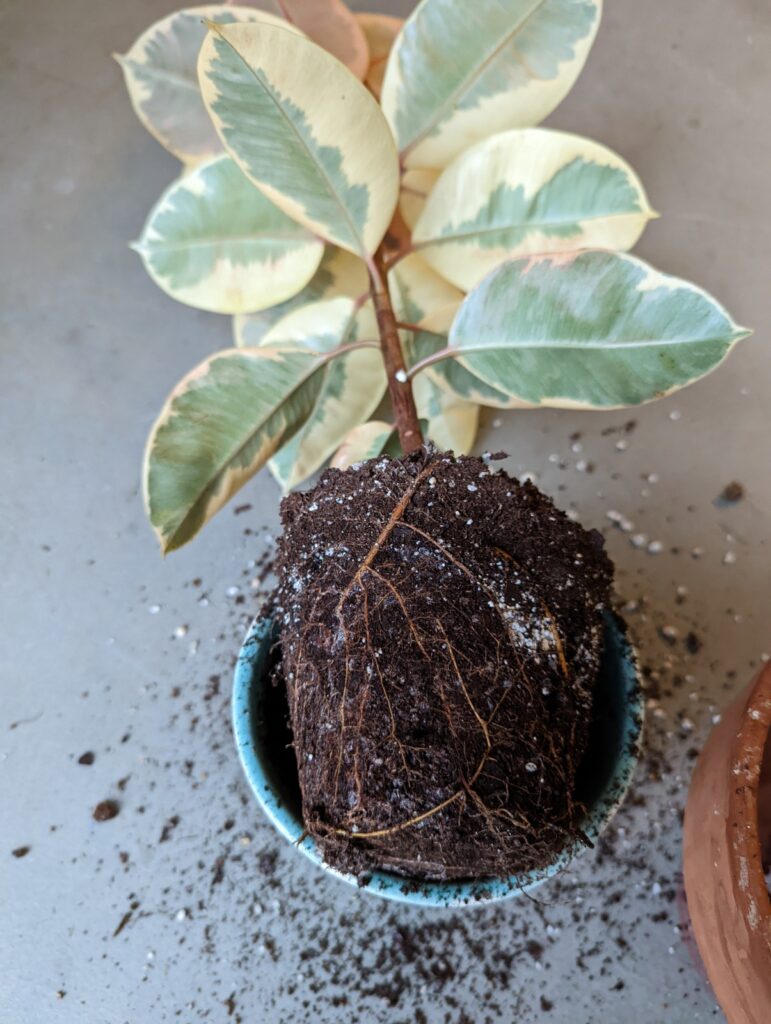
I actually ended up pulling my Rubber Plant out of the pot to check out its roots. As you can see in the picture above, you can see that the roots have begun to fill out the pot. It’s certainly not rootbound though. It could honestly wait to be repotted until next Spring probably, but I already had my repotting stuff ready so I went ahead and used this Rubber Plant for my repotting example below.
Leaves are Falling Off
This happens more so with my much more mature Burgundy Rubber Plant. When I needed to repot that plant last year, I notice that some of the lower leaves have been yellowing and eventually falling off. Check out my post on repotting a much larger Rubber Plant here. Lower leaves falling off doesn’t necessarily mean anything is wrong though. In fact, it’s normal for some older leaves to die off. However, I had noticed it was happening more often though, so that contributed to me wanting to repot it.
If you have leaves dying off at the end of a branch or stem, then that’s more of an indication of a problem. It’s most likely a watering and maybe a fertilizing problem if you’ve ruled out water. Start by looking at the soil. You should be able to tell by sticking your finger in the soil if it is too waterlogged or dry and you can visually inspect the roots to see if they are healthy. Healthy roots are firm and usually white-ish. Less likely is the fertilizer issue because Rubber Plants are not heavy feeders. Although, you could be causing issues by over-fertilizing. The best way to check your soil fertility is with these rapitest soil test strips. It measures nitrogen, phosphorus, potassium (n-p-k), and pH. This kit also provides the ideal levels for hundreds of plants so you can check your results against the list.

Soil Dries too Quickly or Not Quickly Enough
Finally, another reason you might want to repot is if your soil dries out too quickly. If soil is drying very quickly, that could mean that you’re not watering enough when you do water, or that the roots are soaking up the water very quickly. If you increase your pot size, that means there will be more soil available to hold moisture for longer. On the other hand, if your pot is staying wet too long, then you may need to downsize. If you’re unsure about whether your soil is too moist or dry, I recommend a cheap soil moisture meter which I have used for years with great success.

Repotting Rubber Plant Step by Step
The first thing to do is set everything up. Make sure you have a pot and your soil mix. It’s actually good to have some gloves too. Rubber Plants bleed white sap if a stem is knocked or a leaf falls off. This sap is a skin irritant for some. As for the pot, if you’re upsizing you typically go with a pot an inch or two larger in diameter than your old pot. If you’re downsizing, get a pot that’s about an inch bigger than the rootball.
Remove the Rubber Tree from the Old Pot
It may take a bit of wiggling back and forth if it’s been a while since you last repotted your Rubber Plant. Mine came out fairly easily because the inside of my old pot is glazed so the roots couldn’t grab onto the inside of the pot walls. I’m moving it into a terracotta pot though and whenever I repot this plant in the future, I guarantee the roots will be stuck to the terracotta because it’s porous. That’s a problem for future me though.
Inspect the Roots
I always recommend you inspect the roots even if you don’t suspect there was a watering issue with your plant. You don’t get the opportunity often, especially with Rubber Plants because they need infrequent repotting. Make sure the roots are free from pests and disease. If they’re mushy or stinky, you probably have root rot. Some people take this time to loosen the rootball up. They say it helps the roots spread out and grow better. I usually don’t do this unless I have to, disturbing the roots too much can be shocking to the plant.
Put it In its New Pot
Finally, it’s time for the new pot! The only must-have for your new pot should be that it has drainage holes. If you need to add drainage check out my post on drilling ceramic and glass. When repotting I cover my drainage holes with a small piece of paper towel to keep the potting mix in while still allowing water to flow out.
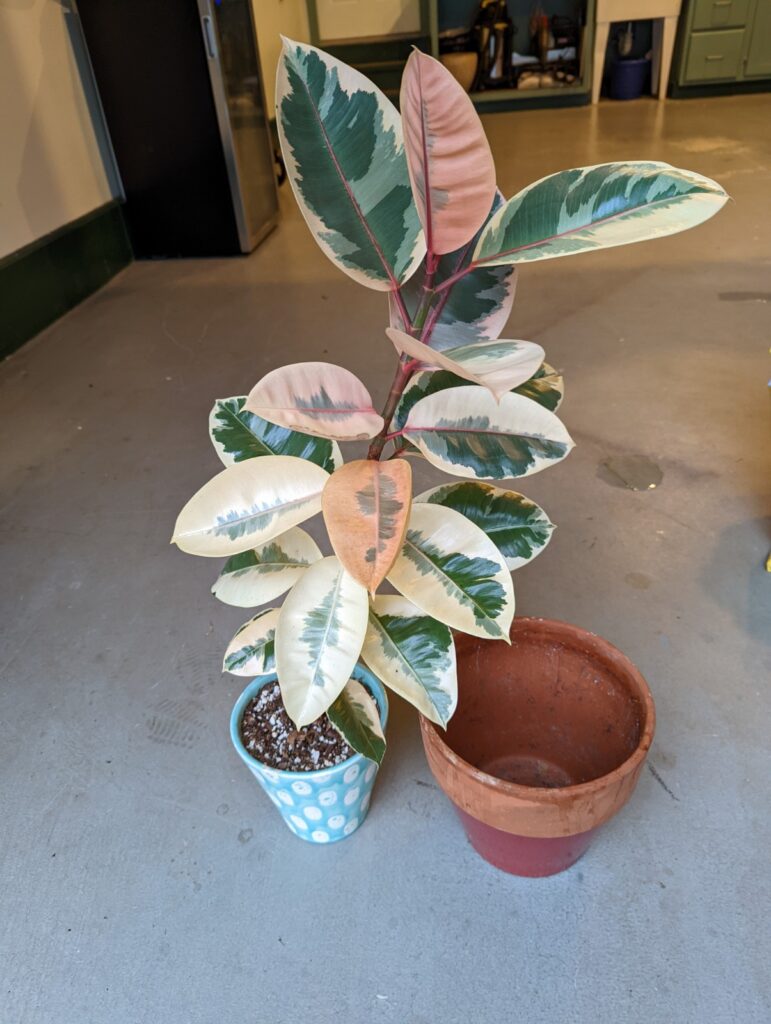
Fill the base of your new pot with some potting soil. Fill it enough so that the base of your plant is at the level you want it when you place the root ball on top of the soil. Next, you just backfill the pot around it. Now is the time to correct any leaning if you had it. My Rubber Plant was leaning quite a bit as you can see from the picture above. Just angle the rootball however you need to get the plant to be upright. The new soil should hold it in place unless you have a really big Rubber Plant.

What to Do After Repotting a Rubber Plant
Repotting your Rubber Plant is a shock to it so you want to avoid other things that may cause shock for a little while. If you can, wait a few days to water, especially if you were repotting because of a watering issue. Typically your new potting soil will be holding some moisture, so that can help your Rubber Plant through those first couple of days. You should also avoid moving it if you have just repotted. Your Rubber Plant is used to getting a certain amount of sunlight, certain humidity, and temperature. Moving it somewhere with drastically different circumstances can also cause shock
Have any questions? Let me know in the Comments.
I'm a long time plant lover on the quest to happily coexist with as many plants as I can. Let's grow!
Hi, I wouldn’t think a paper towel would hold up long enough over the holes.
I’ve always used coffee filters, with stones on top. The filters hold up a long time. I’ve often wondered how long it takes for it to become blocked though…
I’m thinking about trying something like the netting on clementine boxes, or the netting tubes that garlic comes in, which is a finer weave.
Perhaps even the nylon mesh paint filters that you pour large cans of paint through (they are quite large- just one would make quite a few plant strainers.
Another similar material I’m considering is a ‘pool sock’ – it’s a sock made of fine nylon mesh that you put over your skimmer in the pool.
Always thinking about how to improve drainage and retain soil! 😊 Patti
Those are all great ideas! Paper towels have held up for me. I’ve been using them for years.